Search This Blog

Tuesday, December 20, 2011

-:How to crack any type of Software Protection:-

Softwares you need : - 
W32Dasm and HIEW

Identifying the protection : ====>>>>

Run the program, game, etc., (SoftwareX) that you want to crack without the CD in the CD reader. SoftwareX will not run of course, however, when the error window pops up it will give you all of the vital information that you need to crack the program, so be sure to
write down what it says.

Cracking the Protection : ====>>>>

Now, run Win32Dasm. On the file menu open DISASSEMBLER > OPEN FILE TO DISASSEMBLE. Select SoftwareX’s executable file in the popup window that will appear (e.g. SoftwareX.exe). W32Dasm may take several minutes to disassemble the file.

When W32Dasm finishes disassembling the file it will display unrecognizable text; this is what we want. Click on the String Data References button. Scroll through the String Data Items until you find SoftwareX’s error message. When you locate it, double click the
error message and then close the window to return to the Win32Dasm text. You will notice that you have been moved somewhere within the SoftwareX’s check routine; this is where the error message in generated.

Now comes the difficult part, so be careful. To crack SoftwareX’s protection you must know the @offset of every call and jump command. Write down every call and jump @offset number that you see (You have to be sure, that the OPBAR change its used color to green). You need the number behind the @offset without the “h.”
Now open HIEW, locate SoftwareX’s executable, and press the F4 key. At this point a popup window will appear with 3 options: Text, HEX, and Decode. Click on “Decode” to see a list of numbers. Now press the F5 key and enter the number that was extracted using Win32Dasm. After you have entered the number you will be taken to SoftwareX’s check routine within HIEW.

To continue you must understand this paragraph. If the command that you are taken to is E92BF9BF74, for example, it means that the command equals 5 bytes. Every 2 digits equal one byte: E9-2B-F9-BF-74 => 10 digits => 5 bytes.

If you understood this then you can continue.

Press F3 (Edit), this will allow you to edit the 10 digits. Replace the 5 bytes with the digits 90. In other words, E92BF9BF74 will become 9090909090 (90-90-90-90-90). After you complete this step press the F10 key to exit.

=====>>>>>Congratulations! You just cracked SoftwareX!<<<<<=====

-:Hide Your Phone number While Calling:-

Most of you want to call someone while hiding your own phone no identity

so i am publishing the trick for hiding your ph no.

If you want to hide/show your phone number when calling, put one of these codes below in front of the number that you are going to call.
(*#30# / *#31# or *31# / #31# ) Works on most of the networks.


Enjoy!!!!

-:Password Sniffing with Ettercap:-

Introduction

 For those of you who do not know, Ettercap is a network security tool!. It can be used for testing and educational purposes, and it can also be used for quite a few illegal and possibly unethical things. In this guide, I will describe how to sniff passwords over a wi-fi network with this program. It involves using Ettercap to perform ARP-Poisoning. Please understand that this is an educational article. we are not responsible for how you use this information, for any actions you take.

I will be using Linux (Backtrack 4 Beta) for this guide. However, it is nearly the same for all Linux Distros, and probably similar for the Windows version of this program.

Installing and Configuring Ettercap

This is simple enough. If you are on a Debian based system, just open up a terminal and type

CODE :
sudo apt-get install ettercap

CODE :
sudo apt-get install ettercap-gtk


If you are not on Debian, try looking for a package from whatever your distribution is. If you are unable to, head over to and download the source files and compile them. I'm not sure if they come with the gtk built in, since I've never had to compile them from source before.

Once your installation completes, you need to edit the ettercap's configuration file. It should /etc/etter.conf , however, it may also be in /usr/local/etc/etter.conf.

Find the following lines and uncomment them (Delete the #'s at the start of the line)

# if you use iptables:
redir_command_on = “iptables -t nat -A PREROUTING -i %iface -p tcp –dport %port -j REDIRECT –to-port %rport”
redir_command_off = “iptables -t nat -D PREROUTING -i %iface -p tcp –dport %port -j REDIRECT –to-port %rport”


--Don't uncomment the hash I left in the text--

That's it for configuration and installation. Lets get to the fun part!

Download here (mirror)

Sniffing Passwords with Ettercap

Open up a terminal and type:
CODE :
ettercap -G


Now, click on Sniff>Unified Sniffing. A Dialog box will pop open, asking for the wireless interface. Select the one you are using.

You will notice that there are many more options on the top menu bar, for now however, click on hosts>Scan For Hosts. Wait for it to finish.

Now, click on Mitm (Man in the Middle), and select Arp Poisoning, and check the box that says "sniff remote connections". Click ok.

Alright, now, all you need to do is click on start>start sniffing. Go to another computer on your network and head over to some website where credentials are needed (Email, Forums, Facebook,Myspace etc). Log in and you should see your details come up in Ettercap. To stop sniffing, simple click on Start>Stop Sniffing, and Mitm>Stop Mitm attacks.


Please note that there are ways to secure a network against this, and it isn't 100% guaranteed to work 100% of the time. I did this on an unsecured network using the BackTrack 4 Beta, Ettercap, and an Ipod Touch.

Afterword/notes

For some reason, after I end sniffing,my wireless connection is almost always lost. I'm blaming this on the buggy rtl8187 driver, which despite reports of flawless functioning, is continuing to give me grief in certain situations.

Happy Sniffing!!!

Sunday, December 18, 2011

-:Christmas Trick From Google:-

Christmas Trick From Google


Try This...


Its soo cool na.... Try & feel it...

-:Shutdown Computer With Command Prompt or shortcut for shutdown:-

Here is a trick to shutdown your computer  at a specific time. You might be thinking what great about it, well you can shutdown your computer without the use of any software. Just shutdown your computer at specific time from RUN Command. For example if you wish to shutdown at 09:45 am. Type this in


Start=>Run

Type Code:        at 11:35 shutdown -s

To cancel or Abort the shutdown:

Type Code:                   shutdown -a 

Type  Code:  “shutdown –s –m\\computername –t60”. This command will shutdown the computer on network if you have administrative access.  Here computername needs to be replaced by the exact computer name of the computer on the network to work.

Alternative method to create a shutdown timer or simply computer shutdown shortcut

Step 1: Right click on your desktop and choose “New=>shortcuts”.

Step 2: In the box that says “Type the location of the shortcut”,
type in “shutdown -s -t 3600” without the quotation marks and click next.

Note: 3600 are the amount of seconds before your computer shuts down. So , this means 3600 seconds = 60 mints (1 hour). You can change the value in the above code. You can even create multiple shutdown shortcuts. For example a computer shutdown shortcut for 30 minutes, 1 hour, 2 hours, 5 hours etc.,

Step 3: Make up a name for the shortcut and you’re done.

Optional Step 4 : You can change the icon by right clicking=>properities=>change icon=>browse

To abort or cancel the shutdown:

To make an abort key to stop the shutdown timer just create another shortcut and make
the “location of the shortcut” to ” shutdown -a” without the quotes.

Friday, December 16, 2011

-:How to Reset Windows 7 or Vista Password:-

      If somehow you have forgotten your windows password and are looking for way around to login back into your computer then you won’t have to worry.There are many methods are available for resetting password of your windows 7 or vista. But many of them are lengthy or sophisticated.This is one of the simplest method and you only need a windows installation CD/USB to reset the password.It relies on an unpatched bug in windows operating system.


Step-By-Step Guide to Reset Windows Password

  • Insert windows 7 disk into your CD Rom and Restart your computer.
  • Press any key to Boot from the CD and then click on Repair your Computer.
  • Now from the various options select Command Prompt
  •  Now Command Prompt will be open and create a backup of Sticky keys by typing the following command in the command prompt.

      copy c:\windows\system32\sethc.exe c:\

  • Now replace sticky keys with the Command Prompt by typing the following command.
      copy c:\windows\system32\cmd.exe c:\windows\system32\sethc.exe

  • Now Restart your computer.
  • When you get the windows login screen then hit Shift button for 5 times continuously and Administrative Mode of Command Prompt will be open.
  • Now to reset the password just type the following command.


          net user geek MyNewPassword


Remember: geek is the username of the computer and MyNewPassword is the password. Replace both as you wish.

  • Login in your computer system with your new Username and Password. 

Now every time when you press Shift key for 5 times then command prompt will be open instead of Sticky keys. To get back these Sticky keys repeat first three steps and then in the command prompt window type the following command.


          copy c:\sethc.exe  c:\windows\system32\sethc.exe.

-:How to get Movie maker in windows 7:-

As many of us know windows XP has a simple and excellent application which is named as Windows Movie Maker.The Movie Maker is used to make some beautiful animation with photo’s,video’s along with or without sound.But in Windows 7 by default the Movie Maker is missing…..

But dont worry about it you can get it eaily...

1.Jus Go to the following addres

http://windows.microsoft.com/en-IN/windows7/products/features/movie-maker

2.And download Windows Live Movie Maker.

3.Then install it in your system or may install automatically after download completed.

4.Now you can enjoy the Movie Maker on Windows 7 with additional features.

Thursday, December 15, 2011

-:Login To Any Site Without Registering:-

Guyz...

Now, You can login any site without registering...

Just Login with others details....

Visit this site, And enter the site name that you want to login:-

www.bugmenot.com

Wednesday, December 14, 2011

-:Change Your Processor Name As You Like:-

Change Your Processor Name As You Like

1. GO TO START>RUN>TYPE REGEDIT>

2. HKEY_LOCAL_MACHINE>HARDWARE>DISCRIPTION>SYSTEM>CENTRAL PROCESSOR>ON RIGHT HAND SIDE RIGHT CLICK ON PROCESSOR NAME AND STRING AND THEN CLICK ON

MODIFY AND WRITE WHAT EVER YOU WANT OR NAME IT PENTIUM 5 OR 7 MORE

OR SIMPLY GO TO RUN TYPE REGEDIT THEN TO FIND PRESS CTRL+F THEN TYPE PROCESSOR NAME AND CHANGE WHATEVER YOU WANT.....

BE ADVANCCED THAN OTHERS.......

-:Schedule a task in Windows 7:-

In windows 7 ,you can use the Task Scheduler  to create a task that opens the program for you automatically according to the schedule you choose. Below steps will show you to schedule auto shutdown as an example.

1. Click Start ,type scheduler in your search box then press Enter to open Task Scheduler

2. In the right pane of Task Scheduler window,click Create Basic Task

3. Type a name for the task and an optional description, and then click Next

4. Select a schedule based on the calendar, click Daily, Weekly, Monthly, or One time, click Next;
Then specify the time you want to use, and then click Next

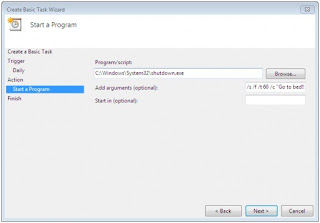
5. Choose Start a program ,then click Next

6. Click Browse and select C:\Windows\System32\ and selece shutdown.exe as your program ,and add
/s /f /t 90 /c "your comments"
as arguments  (/t 90 will set the time-out period before shutdown as 90 seconds  ) ,then click Next


 7. Click Finish.

-:Gmail Drive guide to use Gmail space as online storage drive hack:-


Gmail is really famous among users of all the email clients available on the web and that is not because it has a cool interface rather it is famous for its reliability and huge space which includes storage space of 6000 megabytes  and increasing. Google doesn’t stop here and recently Google announced that users can now buy more online storage for Google services just by paying a little amount. So why not use this online storage space and use it externally probably as a network drive or one of your own computer hard drives.


Use Google Storage Space as Google Drive

I am going to show different methods by which your can use your Gmail Account space as your external hard drive that too free. You will be able to download (or should I say copy) attachments from your Gmail account to your computer just as you would do from a drive on your computer. You can also use this space to upload content direct from your computer and save it online in your Gmail account.

1. GMAIL DRIVE


GMail Drive is a Shell Namespace Extension that creates a virtual filesystem around your Google Mail account, allowing you to use Gmail as a storage medium.

GMail Drive creates a virtual filesystem on top of your Google Gmail account and enables you to save and retrieve files stored on your Gmail account directly from inside Windows Explorer. GMail Drive literally adds a new drive to your computer under the My Computer folder, where you can create new folders, copy and drag’n'drop files to.

With GMail Drive you can easily copy files to your Google Mail Account and retrieve them again.
When you create a new file using GMail Drive, it generates an e-mail and posts it to your account. The e-mail appears in your normal Inbox folder, and the file is attached as an e-mail attachment. GMail Drive periodically checks your mail account (using the Gmail search function) to see if new files have arrived and to rebuild the directory structures. But basically GMail Drive acts as any other hard-drive installed on your computer.
You can copy files to and from the GMail Drive folder simply by using drag’n'drop like you’re used to with the normal Explorer folders.

Because the Gmail files will clutter up your Inbox folder, you may wish to create a filter in Gmail to automatically move the files (prefixed with the GMAILFS letters in the subject) to your archived mail folder.

 Please note that GMail Drive is still an experimental tool. There’s still a number of limitations of the file- System(such as total filename size must be less than 65 characters). Since the tool hooks up with the free Gmail Services provided by Google, changes in the Gmail system may break the tool’s ability to function. I cannot guarantee that files stored in this manner will be accessible in the future.

Download

2. PHP GMAIL DRIVE (PGD)


Php Gmail Drive is a new type of file sharing utility. Unlike typical file servers (say xDrive) it uses Gmail as backend file server. You can enjoy it simply by hosting a small PHP script in your web site without any database. Gmail file space is more than 2GB, so you can imagine you already have such a big space on internet. However, you will require a Gmail account (If you don’t have any Gmail address, go GmailSwap or ask your friends.). PGD automatically connects Gmail server and fetches list of all attached files and generate downloadable links in a tree like view. If you are looking for a file server to upload your music or notes without any hassle, PGD is ideal for you. Technically speaking PGD is wrapper of Gmailer . Thought there is  no need to know hecks of PHP or Gmailer.  Just you have to check that your PHP hosting service provider has curl extension of PHP to handle HTTP/HTTPS traffic.

Features :-
  • Successfully connects to Gmail and only grabs list of Attachments in Gmail messages.
  • List of attachments are displayed with inbuilt Javascript engine. You can customize output to any other formats.
  • 100% compliant to GMAILFS. So you can upload with Windows Gmail Shell extension or Linux GmailFS utilities.
  • Supports Multiple Gmail accounts in the same script .
  • Supports all browsers.
  • Total size is less than 100 KB.

Download Latest Version

Monday, December 12, 2011

-: Create Folders And Files With NO! Name :-

This trick will allow you to create files and folders without any name.

Just follow the steps as given below :-

1) Select any file or folder.

2) Right click on it, select 'Rename' or simply press 'F2'.

3) Press and hold the 'Alt' key. While holding the Alt key, type numbers '0160' from the numpad.

Note :- Type the numbers '0160' from the numpad, that is, the numbers present on the right side of the keyboard.
Don’t type the numbers which are present on top of the character keys.

4) Press Enter and the nameless file or folder will be created.

Reason :- The file or folder that seems nameless is actually named with a single space.


But what if you want to create another nameless file or folder in the same directory ?
For this you will have to rename the file with 2 spaces.
Just follow the steps given below :-

1) Select file, Press 'F2'.

2) Hold 'Alt' key and type '0160' from the numpad.

3) Release the 'Alt' key. Now without doing anything else, again hold 'Alt' key and type '0160'.

4) Press 'Enter' and you will have second nameless file in the same directory.

5) Repeat step 3 to create as many nameless files or folders in the same directory.

(We have a problem with deleting these folders, to do so, start your computer in 'Safe Mode' and delete it from there.)

-: Remotely Shutdown Your Computer With Cellphone :-

This video will show you how to shutdown your computer from anywhere using a cell phone, Microsoft Outlook and a free account (Gmail, Yahoo, etc...) from www.kwiry.com .


Enjoy It :-)

-: Creating IM Bot :-

This quick tutorial will show you how to develop your own functional IM bot that works with Google Talk, Yahoo! Messenger, Windows Live and all other popular instant messaging clients.
To get started, all you need to know are some very basic programming skills (any language would do) and web space to host your “bot”.
For this example, I have created a dummy bot called “insecure” that listens to your IM messages. To see this live, add insecure@bot.im to your GTalk buddy list and start chatting.


If you like to write a personal IM bot, just follow these simple steps:-
Step 1: Go to www.imified.com and register a new account with a bot.
Step 2: Now it’s time to create a bot which is actually a simple script that resides on your public web server.
It could be in PHP, Perl, Python or any other language.
Example Hello World bot:
The example below illustrates just how easy it is to create a bot.
This example is coded in PHP.
<?php
switch ($_REQUEST['step']) {
case 1:
echo "Hi, what's your name?";
break;
case 2:
echo "Hi " . $_REQUEST['value1'] . ", where do you live?";
break;
case 3:
echo "Well, welcome to this hello world bot, " . $_REQUEST['value1'] . "<br>from " . $_REQUEST['value2'] . ".<reset>";
break;
}
?>

Step 3: Once your script is ready, put it somewhere on your web server and copy the full URL to the clipboard.
Step 4: Now login to your imified account, paste the script URL

Screen Name: insecure@bot.im
Bot Script URL: http://www.insecure.in/imbot.php

Step 5: Add that im bot your friends list. That’s it.
This is a very basic bot but the possibilities are endless.
For instance, you could write a bot that will send an email to all your close friends via a simple IM message. Or you could write one that will does currency conversion.

-: Running Multiple Instances of Google Talk :-

Users of Google Talk (GTalk) can also let GTalk go to polygamy, that\92s running multiple instances of Google Talk and login to multiple Google accounts on Google Talk. The polygamy trick can be done without any crack, patch or hack, with just a simple command line parameter or switch /nomutex appended to the Google Talk shortcut.

Ability to polygamy running multiple Google Talk is useful if users have multiple Google Talk accounts (or Google or Gmail accounts that used to login to GTalk) or multiple profiles or personalities, and don\92t want to log on and off from one account to another account every time when want to switch, or want to log in to all accounts at the same time on the same computer.

You can add the /nomutex switch or parameter to existing Google Talk shortcut, or create a new shortcut with the /nomutex command line parameter.

To edit existing Google Talk shortcut:

1) Right click on the Google Talk shortcut.
2) On the right click contextual menu, click on Properties.
3) Go to Shortcut tab on Google Talk Properties window.
4) On the Target textbox, add in the /nomutex to the end of the line so that it looks like below (or you can simply copy and paste the below syntax and replace the original).

Target: "C:\Program Files\Google\Google Talk\googletalk.exe" /nomutex

5) Click on OK.

To create a new shortcut for Google Talk:

1) Right-click on the desktop or anywhere you want to place the GTalk shortcut.
2) Select New on the right click context menu.
3) Then select Shortcut.
4) Copy and paste the following line to the text box when prompted to type the location of the item:

\93C:\Program Files\Google\Google Talk\googletalk.exe\94 /nomutex

5) Click on Next.
6) Give the shortcut a proper name such as Google Talk or Google Talk Multiple or Google Talk Polygamy.
7) Click OK until you are done.

If you have hex editor, you can act like a hacker and modify the bits in Google Talk program so that it will always allow multiple instances of GTalk to be launched whether the /nomutex switch is specified or not.

Launch hex editor and open googletalk.exe, then search for the following patterns in the hex editor:

004536FD . 3BC6 CMP EAX,ESI
004536FF . 75 05 JNZ SHORT googleta.00453706

Modify the string to look like the following:

004536FD . 8BC1 MOV EAX,ECX
004536FF . EB 05 JMP SHORT googleta.00453706

How this Works?
The mutex is short for mutual exclusion object.
A mutex is a program object that allows multiple program threads to share the same resource, but not simultaneously.

So, in the hack above, we used nomutex (no-mutex) to use the same resources simultaneously....!